Showing posts with label windows 10. Show all posts

Thursday, 22 October 2020

How to Remove Edge Browser Tabs From Alt+Tab on Windows 10

Microsoft Windows 10 October 2020 Update is out today. The update isn’t a major one, but it does see some interesting tweaks. These include changes to the Start menu and the way the Alt Tab function works.

The Start Menu, Microsoft is doing away with the solid background behind app icons. This gives a cleaner look to the start menu, it’s overall still the same Start Menu, just that it looks a little cleaner.

As for the Alt Tab function, this is something that would only affect those who use Microsoft Edge. Just before this update, Alt Tab not only lets you switch between your open windows, but also any Edge browser tabs you have. With the update, you can turn this off so that you get the classic Alt Tab experience.

And finally, the Windows 10 October 2020 update, you’ll be able to switch to higher refresh rates from the settings menu. Before this, you’ll have to go to the app that manages your graphics cards.

While the Windows 10 October 2020 update rolls out today, you may not be able to get it immediately. Microsoft is throttling availability over the coming weeks so that the update experience is a smooth one for everyone. (courtesy: Link)

If you like to remove the Edge Browser Tabs on Windows 10, here is the link to the steps. 

  1. In Settings, navigate to System > Multitasking.
  2. In Multitasking settings, scroll down until you see “Pressing Alt+Tab shows” and click the drop-down menu beneath it.
  3. In the menu that appears, select “Open Windows Only.”
  4. After that, close Settings. The next time you use Alt+Tab, you will no longer see Edge tabs as separate entries in the task switcher. Instead, you’ll only see Edge windows listed.
Below is the link to show you with photos/screenshots as guide. 

Thursday, 10 October 2019

Windows 10 version 1903 versus 1809 and 1803

The first Question before reading the rest of the paragraph, is "Are Windows 10 updates really necessary?"
To all those who have asked us questions like are Windows 10 updates safe, are Windows 10 updates essential, the short answer is YES they are crucial, and most of the time they are safe. These updates not only fix bugs but also bring new features, and sure your computer is secure.

This link here shows "What's new in Windows 10 version 1903 - https://docs.microsoft.com/en-us/windows/whats-new/whats-new-windows-10-version-1903

Although it says its an option for Windows 10 version 1809 and 1803 to update to 1903, There are the earlier version of 1703 as well. What I can say is that, those with the initial version of 1703 and 1803 should really update their version of Windows 10. Here is a pictograph for your understanding. It is important to run Windows update as it fixes bugs and covers potholes that viruses usually targets those places to attack.

Thursday, 22 August 2019

Network Printer Going OFFLINE

Recently some network printers especially seems to go offline automatically. Of course, this can be rectified just by doing a "troubleshoot" and the OS will just reset the print spooler and your printer will be back online again.

Here are some methods that can help your Network printer to come back online when it automatically goes offline. 

Method 1:
  1. Check to make sure the printer is turned on and connected to the same Wi-Fi network as your PC. Your printer's built-in menu should show which network it's connected to, or check your printer's manual for more info. 
  2. Verify that your printer is not in Use Printer Offline mode. Select Start  > Settings  > Devices > Printers & scanners. Then select your printer > Open queue. Under Printer, make sure Use Printer Offline is not selected.

 
Method 2:

  1. Unplug wait for 30 seconds to a minute and restart your printer. '
  2. Check cables or wireless connection
  3. Uninstall and reinstall your printer
  4. Install the latest driver for your printer
  5. Run the printing troubleshooter
  6. Clear and reset the print spooler by going to the taskbar, select services and restart the print spooler. 
Method 3:
  1. Untick your SNMP Status Enabled. 
  2. Go to your Printers and Devices under the Control Panel
  3. Select the printer that often goes OFFLINE
  4. Right Click and select Printer Properties
  5. Click on the Printer and select Configure Port
  6. Untick the box that says SNMP Status Enabled.  

Thursday, 31 January 2019

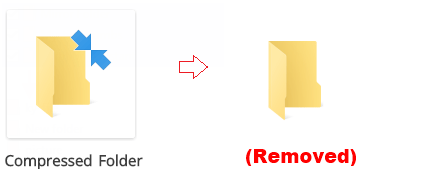
How to Remove Double Arrows Overlay on Icons in Windows 10

In Windows 10, when you compress a file or folder, its icon will have a double blue arrows overlay at the top right corner to indicate that it's a compressed file or folder. If you not happy to see the blue arrow, you can remove them. This article will show you how to remove the double blue arrows icon in Windows 10.


Way 1: Remove Blue Arrows Icons in Registry Editor

To remove double blue arrows icon on folders and files, you have to download the ZIP archive which contains the empty icon. It will be used instead of the blue arrows icon.

Step 1: Download tranparent icon.

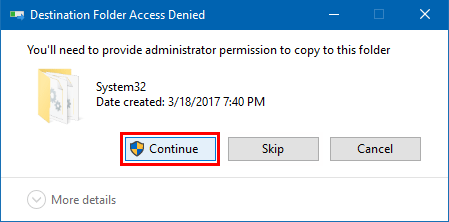
Step 2: Then move it into your C:\Windows\System32 folder. If prompted to provide administrator permissions, click on Continue to proceed.


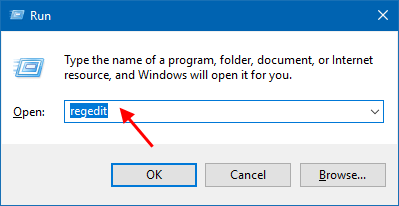
Step 3: Open Registry Editor.(run regedit)


Step 4: In registry editor, go to the following path:

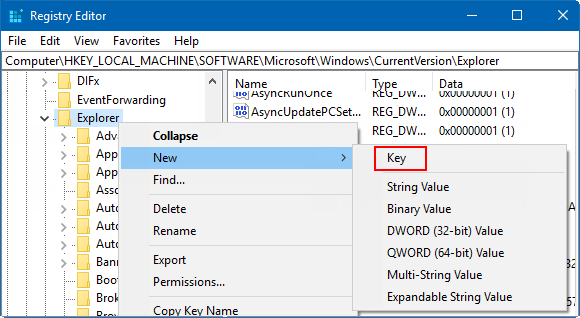
HKEY_LOCAL_MACHINE\SOFTWARE\Microsoft\Windows\ CurrentVersion\Explorer

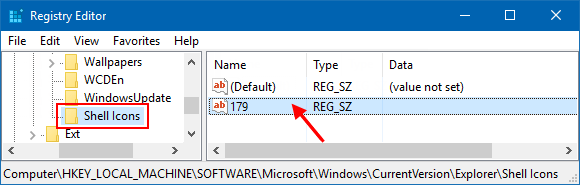
Step 5: Create a new subkey named Shell Icons.

Right-click on Explorer, select New > Key, then give it a name Shell Icons.


Step 6: Under the Shell Icons subkey, create a new string value and name it 179.


When done, close registry editor. Restart your PC, you'll find blue arrows icon is removed.


Way 2: Remove Blue Arrows Icon in Properties

To remove double blue arrows icon in file or folder Properties, here's how:

Step 1: Press Win + E keys to open File Explore. Go to Document directory.

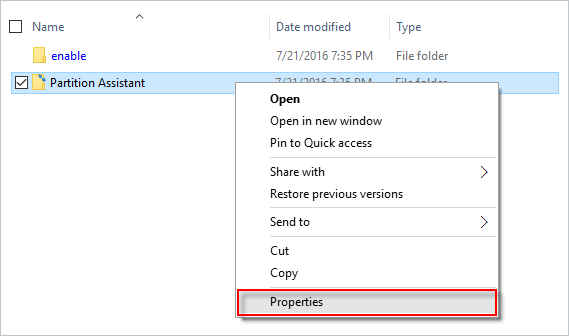
Step 2: Right-click on that folder with double blue overlaid and then select Properties.


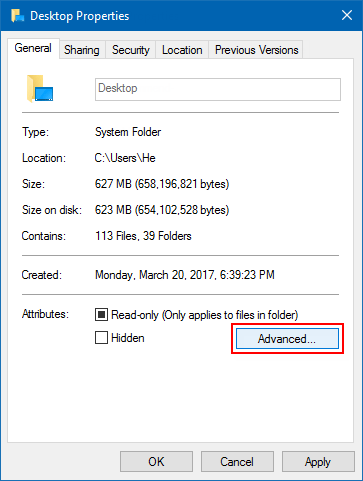
Step 3: Under the General tab, select Advanced in the bottom right corner.


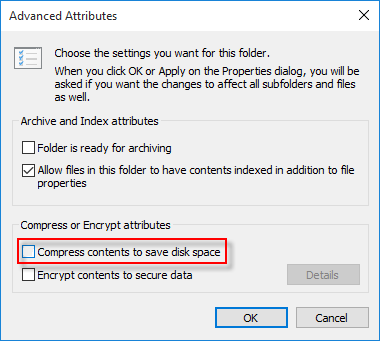
Step 4: Clear Compress contents to save disk space checkbox. Click OK


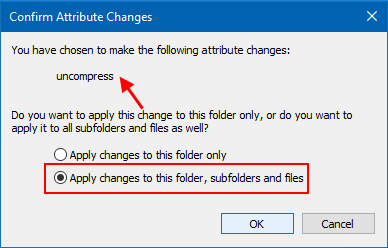
Step 5: In Properties window, then Apply.


Select Apply changes to all folders and sub-folders option to confirm attribute changes.


You'll see the double blue arrow disappear. You can repeat do this action for other folders in different directories.

Tuesday, 15 January 2019

Windows folder or file with double blue arrows at the top right - what it means


Actually its my 1st time seeing it. You would think that's a surprise for someone like me, but its true. The new era here focus mostly on SSD hdd powered notebooks. Mostly comes with an extended SATA hdd to support storage files. SSD is suppose to make your computing Operating System and software run faster. However, some laptop/notebook only have SSD slots. This is where I start seeing these strange icons on some files and folders.

If you haven't had the clue to what I'm saying, its these "File icon with 2 blue arrows on the top right corner". Below is a link to what these signifies. This happens especially when you only have one hdd and you are running on Windows 10. The higher capacity of SSD, the more expensive they are. Most of the top branded laptops uses 128 or 256GB SSD. With Windows 10 installed, then other software such as Office, and large software will then to make your free space smaller. And when you have lots of files and folders to save in your SSD, the less capacity it holds. Hence, comes this where you can compress your files and folders but still be able to use them.

So for those that come across these icon, don't need to panic. Below is just one of many website links that you can find when you do a search. Some even have steps to remove the icon arrows. But for now, its just an information that I would like to share.

https://www.howtogeek.com/307509/what-does-a-windows-folder-icon-with-double-blue-arrows-mean/


Sunday, 15 October 2017

Windows System Protection

Windows System Protection
What does it do? From my understanding, its suppose to protect the windows system from being corrupted from software that are not compatible with windows. I have to honestly point out that I had almost forgotten about doing this to all new installed windows. It is relatively important to perform this task. Especially when nowadays there are lots of software that interacts with Microsoft Windows. Some maybe be genuinely compatible with Windows. But some seems to be working fine until an update from either Windows or the software. It won't take up too much of your harddisk space as nowadays our standard or basic hard disk space ranges from 500GB to 1TB.

Just configure the system protection disk usage at 5%. And create a notable remark to note when you performed the system protection.

When your system encountered a problem booting, you can always go to system restore and restore to the last known protection that you have made.

https://www.drivereasy.com/knowledge/turn-system-protection-windows-10/

Wednesday, 7 June 2017

10 easy ways to speed up Windows 10

10 easy ways to speed up Windows 10
I have some customers that upgraded or purchase new computers and complained that they are still not familiar with Windows 10 or that it is slow on a startup to medium and to powerful computer machines.
I found this link on the web and would like to share the tips with you. I'm not sure if it will speed up Windows 10 but it looks like it can make it less complicated and more customization to your liking.

1. Go opaque
Windows 10's new Start menu is sexy and see-through, but that transparency will cost you some (slight) resources. To reclaim those resources, you can disable transparency in the Start menu, taskbar, and action center: Open the Settings menu and go to Personalization > Colors and toggle off Make Start, taskbar, and action center transparent.

2. No special effects

Making the Start menu, taskbar, and action center transparent is one thing, but Windows 10 still has a lot of other snazzy, built-in special effects. To really go bare-bones on the special effects, right-click the Start button and click System.

Click Advanced system settings to open the System Properties menu. On the Advanced tab under Performance, click Settings...
This will open the Performance Options menu. In the Visual Effects tab, either choose Adjust for best performance to turn off all unnecessary animations and special effects, or choose Custom: and deselect the visual effects you think can live without. When you're finished, click OK to apply your changes.

3. Disable Startup programs
If your PC is taking a long time to boot up -- and you've enabled Fast Startup and everything -- you may have too many programs starting up when you turn your computer on. To fix this, right-click on the Start button and click Task Manager. Click the Startup tab (click More details if you don't see the Startup tab) and peruse the list of programs that start up with your computer. If you see a program that doesn't need to be there, right-click it and click Disable. You can also arrange the list of programs by Startup impact, if you'd like to see the programs that are taking up the most resources (and time).

4. Find (and fix) the problem
Windows 10 has a built-in performance troubleshooter that can help you find and fix any problems that might be affecting your PC's speed. To open the troubleshooter, right-click on the Start button and click Control Panel. Under Security and Maintenance at the top, click Troubleshoot common computer problems. Next, under System and Security, click Run maintenance tasks.

5. Reduce the Boot Menu Time-out
When your computer starts up, the boot menu is displayed for a certain amount of time before the operating system loads. This gives you time to do things like start Windows in Safe Mode. You can shave a few seconds off your startup time by changing the boot menu time-out, which is set to 30 seconds by default.
To do this, right-click on the Start button and click Control Panel. Go to System > Advanced system settings, and, under Startup and Recovery, click Settings.
Next to Time to display list of operating systems:, change the value from 30 seconds to 10 seconds and click OK.

6. No tipping
In an effort to be helpful, Windows 10 will sometimes give you tips on how to get the most out of the OS. It scans your computer in order to do this, a process that can have a slight impact on performance. To turn off these tips, go to Start > Settings > System > Notifications & actions and toggle off Get tips, tricks and suggestions as you use Windows.

7. Run Disk Cleanup
This one's a win-win. It'll improve performance and free up space on your hard drive. Disk Cleanup has been around forever, but this trusted Windows utility can still help clean out the temporary files, installers and other junk littering your hard drive. To run it, just search for Disk Cleanup, run it and click the button labeled Clean up system files. 

8. Eradicate bloatware
If your PC came with pre-installed apps you don't want or need, get rid of them. Same goes for any apps you installed that you later found to be of little or no use. Right-click the Start menu, choose Control Panel and under the Programs header, click Uninstall a program. Peruse the list from time to time and select the programs you no longer need and click Uninstall at the top of the list.

9. Power plan
Make sure you aren't using a Power saver plan if you don't need to. Even desktops will sometimes feature a power-saver option, which doesn't do you any good unless you are trying to conserve battery life. Open the Control Panel and go to Hardware and Sound > Power Options to see which power plan you are currently using. For better performance, make sure you are using a High Performance or Balanced plan (or a plan from the PC manufacturer that says it's balanced).

10. Restart your PC
Is speeding up your computer as simple as...restarting it? Maybe. Restarting your PC clears out its memory and stops any processes that might be taking up resources. Also, shutting down your computer is not the same as restarting it -- shutdown is affected by Windows 10's Fast Startup, which saves a snapshot of your PC and its processes in a hiberfile for faster boot-up. Restart is not affected by Fast Startup, so if you have Fast Startup enabled, restarting your PC is the only way to fully clear the memory and shutdown processes.

Original post by CNET